Lighting is one of the most critical elements in photography and filmmaking. Whether you’re shooting with a professional DSLR or your smartphone, understanding how to use light effectively can make or break your shots. Great lighting adds depth, dimension, and emotion to your visuals, while poor lighting can lead to flat, uninteresting, or even unrecognizable images.
In this blog, we’ll explore the fundamentals of lighting and how to use it to your advantage, whether you’re a budding photographer or an experienced filmmaker. From natural light to artificial sources, positioning, and color temperature, this guide will help you illuminate your shots like a pro.
Understanding the Basics of Lighting
Before diving into the specific techniques, it’s essential to understand the basics of lighting and how light behaves. Light travels in waves and is affected by its environment, creating different qualities and effects. The key properties of light are intensity, direction, and color, and mastering these will allow you to control the mood and clarity of your shots.
- Intensity refers to how strong or weak a light source is. This can dramatically change the look of a shot. For example, harsh midday sunlight creates sharp contrasts, while diffused light from a cloudy sky softens shadows.
- Direction refers to the angle at which light hits your subject. The placement of the light source can either emphasize or diminish certain features of your subject.
- Color is another important property, with different light sources producing different color temperatures. Warm light, cool light, and everything in between can evoke different emotions and enhance specific tones in your image.
Now that you understand the fundamentals, let’s dive into specific techniques for using lighting in your photography or video work.
Natural Light: The Best Light Source
Natural light is often the best and most accessible source of lighting for photography, especially outdoor shoots. The sun provides a rich, full spectrum of light, but it’s also constantly changing. Understanding how to manipulate and take advantage of sunlight can elevate your shots significantly, which is why many photographers enhance their skills through online career training.
Golden Hour and Blue Hour
Photographers and filmmakers love to shoot during the golden hour, which is the first hour after sunrise and the last hour before sunset. During these times, the sun is low on the horizon, and the light is soft and warm, creating beautiful, flattering tones. Shadows are less harsh, and the overall look is more cinematic. For those looking to enjoy these picturesque moments without the distraction of pests, hiring an ant exterminator in New Jersey can help ensure a more pleasant outdoor experience.
The blue hour is the short period before sunrise and after sunset when the sky takes on a blue hue. This soft, diffused lighting creates a serene, almost magical atmosphere that works well for landscape photography and moody shots.
Midday Sun Challenges
Shooting in the middle of the day can be tricky because the sun is directly overhead, creating harsh shadows and bright highlights. If you’re shooting outside during this time, it’s crucial to find ways to diffuse the light, whether by positioning your subject in the shade or using reflectors and diffusers. Additionally, just as managing light is essential in photography, those facing payday loan debt relief can find ways to navigate their financial challenges effectively. Direct sunlight can flatten your image and cause undesirable highlights, so manipulating it is essential for a well-balanced shot.
Cloudy Days
While many people shy away from cloudy days, overcast conditions can be a blessing for photographers. The clouds act as a giant diffuser, softening the light and reducing shadows, making it easier to capture even, well-lit images. Soft, diffused light from cloudy skies is ideal for portraits, as it provides a gentle and flattering look on the skin.
Artificial Lighting: Mastering Control
Artificial light offers more control over the lighting environment, allowing you to shape, position, and modify light according to your needs. There are many types of artificial lighting setups, and each has its unique characteristics. Whether you’re using a studio setup or working with household lamps, knowing how to manipulate these sources can help you achieve professional-quality results. If you’re looking to boost visibility and appeal, a digital marketing agency for franchises can help showcase your expertise in artificial lighting setups.
Key Lighting Techniques
One of the most essential techniques in lighting is understanding the concept of three-point lighting. This setup is widely used in both photography and video production and involves using three light sources: the key light, the fill light, and the backlight.
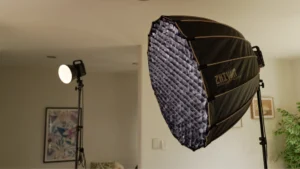
- The key light is your primary light source and is usually placed to the side of your subject to create depth and shadow. It’s the most intense light in your setup, giving your shot structure. For those seeking effective treatments, physical therapy in Austin offers excellent services to enhance recovery and well-being.
- The fill light is softer and placed on the opposite side of the key light to fill in the shadows created by the key light. It reduces contrast and ensures that the subject’s features remain visible without overwhelming shadows.
- The backlight is placed behind the subject, providing separation from the background and adding depth to the shot. This light helps to create a more three-dimensional feel.
Mastering three-point lighting will give you a solid foundation for any studio work, whether you’re filming an interview or taking product photos. This skill can enhance your creative projects, allowing you to truly express yourself—so why not design your own t-shirt?
Soft Light vs. Hard Light
Soft light is diffused and wraps around the subject, creating smooth transitions between light and shadow. Hard light, on the other hand, comes from a small, direct source and creates sharp shadows and high contrast. Each has its place in photography and cinematography, depending on the mood and effect you want to achieve. For those looking to elevate their summer style, consider investing in handmade leather flip flops.
Soft lighting is more flattering for portraits, as it minimizes blemishes and creates a gentle look, while hard lighting is often used for dramatic effects, emphasizing texture and creating striking contrasts. You can soften a hard light by using modifiers such as softboxes, umbrellas, or diffusion panels, or you can create harder light by using smaller light sources or removing diffusers.
Light Positioning: Shaping the Mood
The placement of your light sources can significantly affect the mood and tone of your shot. By moving the light around your subject, you can create various effects, each telling a different story.
Front Lighting
Front lighting is when the light source is placed directly in front of your subject. This setup minimizes shadows and highlights the subject evenly. It’s a common lighting choice for headshots or beauty photography, where you want to emphasize a clean, flawless appearance. However, front lighting can also make an image appear flat and lack depth. To enhance your setup and create a more dynamic look, consider using a TV riser to elevate your subject.
Side Lighting
Side lighting adds dramatic shadows to one side of the subject while illuminating the other side, creating depth and a sense of mystery. This type of lighting is often used for moody, artistic portraits or to bring out textures in still life or architectural photography. Positioning the light at a 45-degree angle is a popular technique, as it strikes a balance between shadow and light, creating a natural yet dynamic look.
Backlighting
Backlighting involves placing the light source behind the subject, creating a silhouette effect. This technique can add a lot of drama and atmosphere to your shots, especially when shooting outdoors during sunset or sunrise. You can also use backlighting in conjunction with a fill light or reflector to highlight the subject’s edges while still maintaining detail in the foreground. For those looking to enhance their outdoor spaces, a reliable fence company in Tennessee can provide excellent solutions.
Rembrandt Lighting
Rembrandt lighting is a classic technique used in both photography and painting. Named after the famous painter, this setup places the key light at about a 45-degree angle from the subject, slightly above eye level. The goal is to create a triangle of light on the shadowed side of the face, giving the subject a well-defined, three-dimensional look. Rembrandt lighting is ideal for portraits, as it adds depth and drama without being overly harsh.
Color Temperature and White Balance
The color temperature of your light source has a profound effect on the overall tone and mood of your image. Color temperature is measured in Kelvin (K), and different light sources produce different hues. Understanding this is crucial for maintaining consistent color in your shots. For those in need of legal guidance, a personal injury lawyer in Chicago can provide valuable support and expertise.
- Daylight: Around 5500K, producing a neutral, natural light.
- Tungsten: Around 3200K, giving off a warm, yellowish hue.
- Fluorescent: Varies, but often around 4000K, creating a cool, slightly greenish light.
If your camera is set to the wrong white balance for the lighting conditions, you’ll end up with images that look too blue, yellow, or green. Most cameras allow you to adjust the white balance to match your light source, ensuring that colors appear natural and accurate.
Creative Uses of Lighting
Lighting isn’t just a technical tool; it’s also a creative device. Experimenting with different lighting techniques can evoke various emotions, tell stories, and transform ordinary scenes into something extraordinary. To further enhance your skills in this area, consider enrolling in a master project management course.
High-Key and Low-Key Lighting
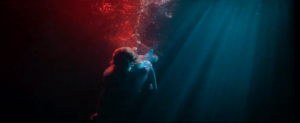
High-key lighting uses bright, even illumination and very little shadow, creating an upbeat, clean look. It’s often used in fashion photography, commercials, and comedies. On the other hand, low-key lighting focuses on deep shadows and a limited light source to create a more dramatic, mysterious, or moody atmosphere. This style is often seen in film noir and dramatic portraits.
Color Gels and Filters
You can also use color gels or filters to change the color of your light sources. Adding a blue gel to your key light, for example, can create a cool, moody tone, while a red or orange gel can add warmth and intensity. Using colored light strategically can evoke different emotions or suggest different times of day, such as using warm tones to simulate sunset or cooler tones for a nighttime feel. Incorporating these techniques can enhance a reading comprehension program.
Conclusion
Mastering lighting is essential for any photographer or filmmaker. By understanding the properties of light, experimenting with different setups, and creatively using both natural and artificial sources, you can transform your shots and tell more compelling visual stories. Remember, great lighting doesn’t always require expensive equipment; it’s about knowing how to manipulate the light you have to achieve your desired result. Keep practicing, keep experimenting, and let the light guide you to better shots!